I was halfway through a frantic Tuesday night, juggling a burnt lasagna, a squeaky dishwasher, and a craving that felt like a tiny, chocolate‑coated tornado in my gut. I dared my roommate to a “dessert duel” – whoever could conjure the most mind‑blowing sweet treat would win bragging rights and the last slice of pizza. He tossed out a boring old brownie, I grabbed a half‑empty tub of cream cheese, and the universe whispered, “Cheesecake Stuffed Chocolate Cupcakes.” I was skeptical, but the idea of a moist chocolate cake hugging a silky cheesecake core was too tempting to ignore. I’m going to be honest — I ate half the batch before anyone else got a chance to try it, and that was the best mistake I ever made.
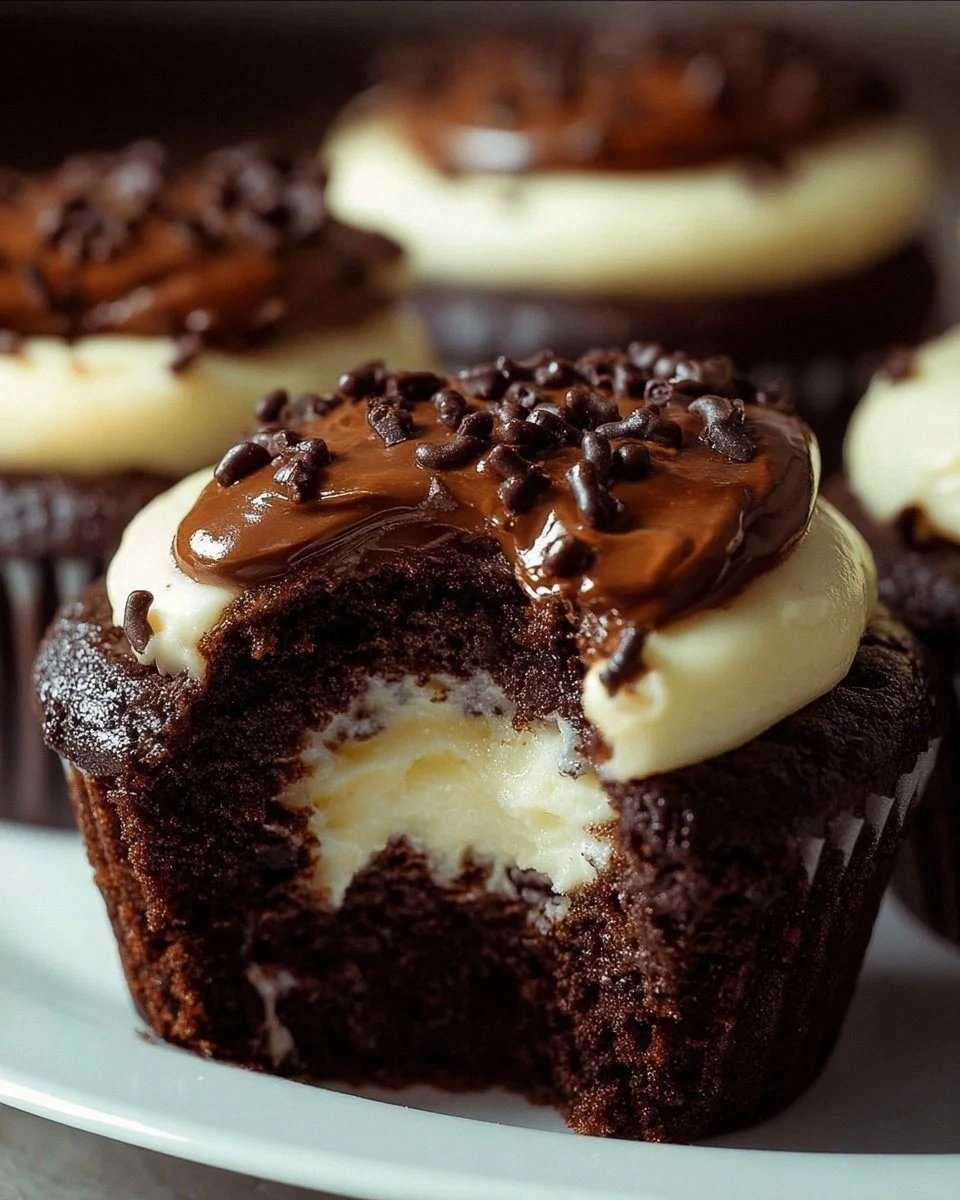
Picture this: the oven humming like a contented cat, the air thick with the deep, earthy perfume of cocoa mingling with the sweet, buttery scent of melted butter. The batter, glossy and dark as midnight, slides into the tin with a whisper‑soft plop. When you crack open a cupcake, the first thing you see is that glossy dome giving way to a creamy, ivory center that oozes out like a secret waiting to be discovered. The bite is a symphony – the outer layer is rich, slightly crisp around the edges, then melts into a velvety cheesecake that’s tangy enough to cut through the chocolate without stealing the spotlight. That contrast? Pure magic.
Most recipes get this completely wrong. They either drown the cheesecake in chocolate, turning it into a soggy mess, or they forget the crucial “stuffed” element, leaving you with a plain chocolate cupcake that’s great but not unforgettable. The secret here is a two‑stage baking process that locks the cheesecake in place, plus a dash of apple cider vinegar that reacts with the baking soda to give the cake a lift that feels like it’s floating on a cloud. I dare you to taste this and not go back for seconds – you’ll be begging for the recipe before the last crumb disappears.
Okay, ready for the game‑changer? I’m about to walk you through every single step — from selecting the perfect cream cheese to the exact moment you know the cupcakes are ready to pop out of the oven. By the end, you’ll wonder how you ever made any other version of this dessert. Let’s get our aprons on, preheat those ovens, and dive into the most decadent, crowd‑pleasing cupcakes you’ve ever baked.
What Makes This Version Stand Out
- Texture: A crisp chocolate crust gives way to a luxuriously smooth cheesecake center, creating a dual‑mouthfeel that’s both satisfying and surprising.
- Flavor Balance: The slight tang of cream cheese cuts through the deep cocoa, while a hint of vanilla ties everything together like a master conductor.
- Simplicity: Only pantry staples and a few fresh ingredients are needed; no fancy equipment or exotic spices required.
- Uniqueness: The “stuffed” technique uses a thin batter barrier that seals the cheesecake, preventing sogginess and keeping the filling perfectly centered.
- Crowd Reaction: Guests often gasp, then grin, then dive in – the surprise factor is as big as the flavor factor.
- Ingredient Quality: Using real cocoa powder and full‑fat cream cheese elevates the taste from “good” to “legendary.”
- Cooking Method: The two‑stage bake (partial bake, then add filling, then finish bake) ensures a stable structure and a flawless rise.
- Make‑Ahead Potential: You can bake the chocolate shells ahead of time and freeze the cheesecake filling, then assemble when you’re ready to serve.
Inside the Ingredient List
The Flavor Base
All‑purpose flour is the structural backbone; it creates the tender crumb that holds the cheesecake without crumbling. If you swap it for cake flour, the cupcakes will be too delicate and may collapse when you bite into them. Look for flour that feels slightly powdery to the touch – that’s a sign it’s fresh. A good tip is to sift the flour with cocoa and leaveners; this aerates the mixture, giving you a lighter texture.
The Chocolate Crew
Unsweetened cocoa powder provides the deep, almost bitter chocolate flavor that balances the sweet cheesecake. Choose a Dutch‑process cocoa for a smoother, richer taste, or stick with natural cocoa if you prefer a brighter, more acidic note. The granulated sugar not only sweetens but also helps to create a glossy crust as it caramelizes during baking. If you’re watching sugar, you can reduce it by up to ¼ cup, but expect a slightly less glossy finish.
The Unexpected Star
Apple cider vinegar might seem out of place, but it reacts with the baking soda to create carbon dioxide bubbles that lift the batter. This tiny acid‑base reaction is what gives the cupcakes that airy, pillow‑like rise while keeping the interior moist. If you’re out of vinegar, lemon juice works just as well – just keep the volume the same.
The Creamy Core
Cream cheese is the star of the stuffing; its high fat content gives that melt‑in‑your‑mouth silkiness. Always use full‑fat, softened cream cheese – a low‑fat version will become grainy when baked. When you beat it with sugar and vanilla, you create a light, airy mixture that won’t collapse inside the chocolate shell. If you can’t find cream cheese, substitute with mascarpone for an even richer texture, though you’ll need a touch more sugar to balance the natural sweetness.
The Final Flourish
Vegetable oil replaces butter for a tender crumb while keeping the cupcakes moist. The oil also helps the batter spread evenly, ensuring each cupcake gets a uniform chocolate crust. Vanilla extract, used both in the batter and the filling, ties the flavors together, giving a warm, aromatic backdrop that makes every bite feel like a hug. Finally, a pinch of salt amplifies every flavor, turning the sweet into something truly unforgettable.
Everything's prepped? Good. Let's get into the real action…
The Method — Step by Step
Preheat your oven to 350°F (175°C) and line a 12‑cup muffin tin with paper liners. While the oven warms, whisk together the flour, cocoa powder, baking soda, baking powder, and salt in a large bowl. This dry mix should look like a deep, chocolate‑gray cloud. I like to sift it twice – it eliminates lumps and guarantees a smooth batter that spreads evenly.
In a separate bowl, combine the vegetable oil, 1 cup of granulated sugar, vanilla extract, water, and apple cider vinegar. The moment the vinegar meets the sugar, you’ll hear a faint fizz – that’s the leavening magic starting. Pour this wet mixture into the dry ingredients and stir until just combined; a few streaks are okay. Over‑mixing will develop gluten and make the cupcakes tough, so stop as soon as the batter looks glossy.
Kitchen Hack: Use a rubber spatula to fold the batter from the bottom up – this keeps air bubbles intact for a fluffier crumb.Spoon about 1‑2 tablespoons of batter into each muffin liner, just enough to cover the bottom. This thin layer will become the “shell” that holds the cheesecake. Tap the tin gently on the counter; you’ll hear a soft thud, indicating the batter has settled evenly. Let this layer bake for 6‑7 minutes – you’re looking for a set edge but still a soft center.
While the shells are in the oven, prepare the cheesecake filling. Beat the softened cream cheese with 1/3 cup of sugar and the second teaspoon of vanilla until light and airy, about 2 minutes on medium speed. Add the egg and continue beating just until incorporated; over‑beating will incorporate too much air, causing cracks later.
Remove the partially baked shells from the oven. Using a piping bag or a sturdy spoon, drop a generous dollop (about 1 tablespoon) of the cheesecake mixture into the center of each shell. The batter around the edges will rise around the filling as it bakes, sealing it inside. If you’re nervous about overflow, give the batter a quick swirl with the back of a spoon to create a tiny moat around the filling.
Kitchen Hack: Chill the cheesecake mixture for 5 minutes before piping – it steadies the texture, preventing it from spilling over the edges.Watch Out: This is the trickiest step. If the batter cracks around the cheesecake, the filling may leak during the second bake. To avoid this, make sure the initial bake is just firm enough to hold shape but still slightly pliable. Also, avoid opening the oven door too often – the sudden temperature drop can cause the shells to collapse.
Return the tin to the oven and bake for an additional 15‑18 minutes. You’ll know they’re done when the tops are set, the edges pull away from the liner, and a faint crack appears on the surface – that’s the perfect sign of a fully set cheesecake core.
Once baked, let the cupcakes cool in the tin for 5 minutes, then transfer them to a wire rack to cool completely. This prevents steam from making the chocolate crust soggy. While they’re cooling, the aroma will fill your kitchen with a scent that’s half‑baked brownie, half‑cheesecake, all‑awesome.
Serve the cupcakes at room temperature, or for an extra wow factor, give them a quick 30‑second blast in the microwave – just enough to melt the chocolate slightly and make the cheesecake ooze like lava. That final warm‑then‑cool contrast is pure magic. And now the fun part: watch your guests’ faces light up as they bite into the hidden cheesecake treasure.
That's it — you did it. But hold on, I've got a few more tricks that'll take this to another level…
Insider Tricks for Flawless Results
The Temperature Rule Nobody Follows
Never bake cupcakes straight from the fridge. Let the batter sit at room temperature for at least 15 minutes before filling the tin. This small pause equalizes the batter temperature, resulting in a more even rise and preventing the dreaded “doughy bottom.” I once tried skipping this step and ended up with a soggy base that felt like a wet sponge – a lesson learned the hard way.
Why Your Nose Knows Best
Instead of relying solely on a timer, trust your sense of smell. When the chocolate crust starts to give off a toasted, slightly caramelized aroma, you’re approaching the perfect doneness. The scent is a reliable cue that the interior is set but not over‑cooked. If you miss this cue, you’ll end up with a dry cheesecake that cracks like thin ice.
The 5‑Minute Rest That Changes Everything
After the cupcakes have cooled on the rack, let them rest for exactly five minutes before serving. This brief pause lets the steam redistribute, making the interior creamier and the crust crisper. It’s a tiny window that transforms a good cupcake into a great one. A friend once tried to plate them immediately and complained the center was “too runny.” Five minutes later, the texture was perfect.
Silky Smooth Fillings Every Time
If you notice tiny lumps in your cheesecake mixture, simply whisk it on low speed for an extra 30 seconds, or run it through a fine mesh sieve. The result is a cloud‑like filling that slides out of the cupcake like a secret message. Skipping this step can leave you with an uneven texture that feels gritty – not the experience we’re aiming for.
The Secret of the Double‑Bake
The two‑stage bake is the heart of this recipe. The first short bake sets the shell, while the second finish cooks the cheesecake gently. If you try to bake everything at once, the outer chocolate will over‑brown before the cheesecake sets, leading to a burnt exterior and a runny interior. Trust the process, and you’ll get that perfect contrast every single time.
Creative Twists and Variations
This recipe is a playground. Here are some of my favorite ways to switch things up:
Mint‑Chocolate Fusion
Add ½ teaspoon of peppermint extract to the batter and swirl in a few drops of green food coloring. The minty bite cuts through the richness, making it a perfect after‑dinner palate cleanser.
Espresso Explosion
Dissolve 1 tablespoon of instant espresso powder in the water before mixing the batter. The coffee notes deepen the chocolate flavor and give the cupcakes a subtle, sophisticated edge.
Berry Burst
Fold a handful of fresh raspberries into the cheesecake filling. As the cupcakes bake, the berries soften and release a bright, tart juice that creates a beautiful pink swirl inside the chocolate shell.
Nutty Crunch
Stir ¼ cup of finely chopped toasted hazelnuts into the batter. The nuts add a pleasant crunch that contrasts with the silky cheesecake, and the toasted flavor brings out the chocolate’s natural sweetness.
White Chocolate Delight
Replace half of the cocoa powder with white chocolate chips and add a pinch of sea salt to the batter. The result is a lighter, buttery cupcake that still delivers the indulgent stuffed experience.
Storing and Bringing It Back to Life
Fridge Storage
Place the cooled cupcakes in an airtight container and store them in the refrigerator for up to 4 days. The chocolate shell stays firm, while the cheesecake remains creamy. Before serving, let them sit at room temperature for 15 minutes to soften the filling.
Freezer Friendly
Wrap each cupcake individually in plastic wrap, then place them in a zip‑top freezer bag. They’ll keep for up to 2 months. To reheat, unwrap and microwave for 20‑30 seconds, or bake at 300°F for 8 minutes – the result is as fresh as the day you made them.
Best Reheating Method
Add a tiny splash (about 1 teaspoon) of water to the bottom of the container before microwaving. The steam revives the chocolate crust and prevents the cheesecake from drying out, giving you that just‑baked feel.