Picture this: it’s a sweltering summer afternoon, the air conditioner is on the fritz, and you’ve just survived a marathon Zoom call that left you mentally drained. You stumble into the kitchen, eyes half‑closed, and the only thing that feels like salvation is the faint hum of the espresso machine in the background. I was there, staring at a half‑filled coffee mug, thinking, “There has to be a better way to turn this bitter wake‑up call into something that feels like a hug in a glass.” That moment sparked a kitchen experiment that turned into the ultimate cool‑down treat you’re about to read about.
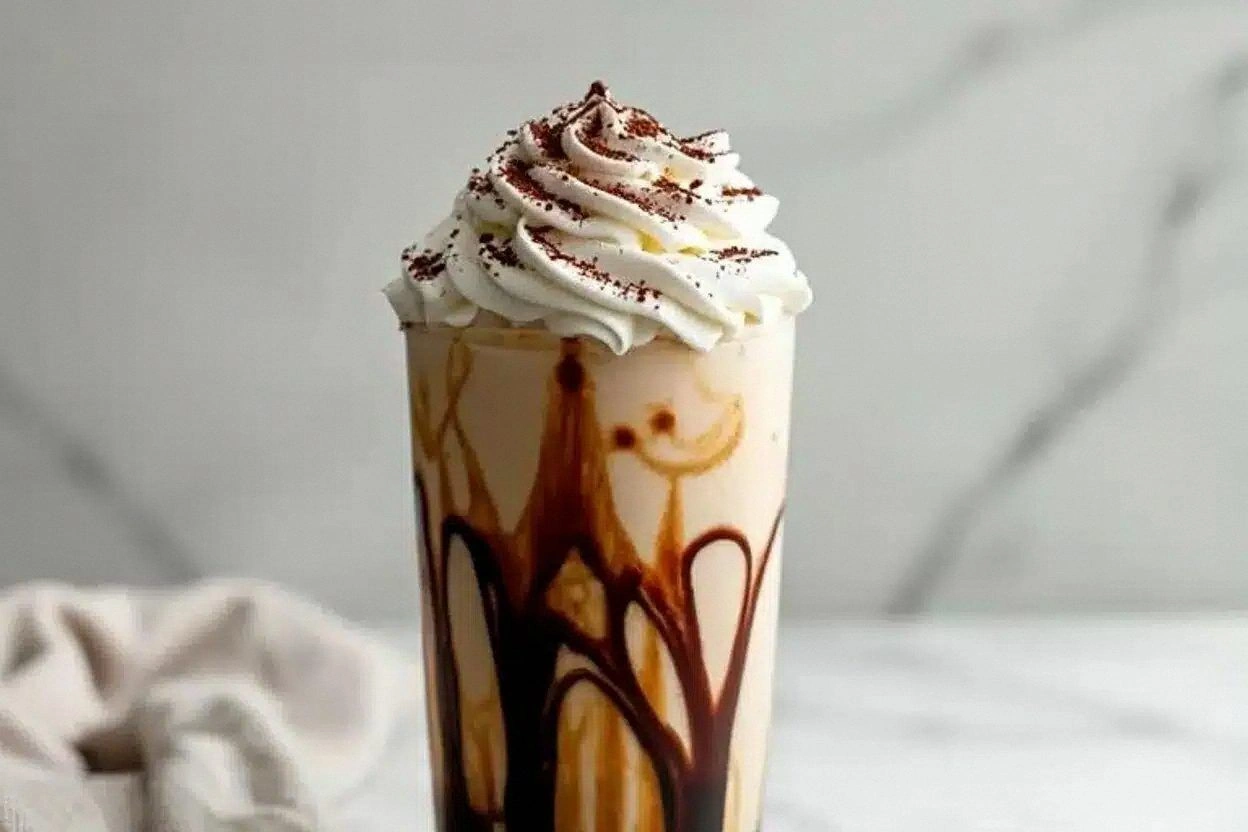
The first sip of the finished drink is a revelation: the rich, velvety chocolate embraces the coffee like a lover’s arms, while the creamy milk and a whisper of vanilla smooth out any bitterness. Imagine the aroma of freshly ground beans dancing with cocoa, the clink of ice cubes as they tumble into a glass, and the soft, indulgent swirl of whipped cream crowning the top. You can almost hear the faint sigh of relief as the cold liquid slides over your tongue, leaving a lingering, silky finish that makes you forget the heat outside. I dare you to taste this and not go back for seconds—trust me, it’s that good.
Most iced mocha recipes out there either drown the coffee in a sea of sugar or skimp on the chocolate, resulting in a watery disappointment. This version, however, balances each component with surgical precision. The secret? A dash of heavy cream that turns the drink from “just cold coffee” into “luxurious café‑style decadence,” plus a quick technique of shaking the ingredients in a sealed jar to achieve that perfect frothy top without a blender. Most recipes get this completely wrong. Here’s what actually works: a 1‑minute shake, a splash of vanilla, and a careful ratio of coffee to milk that preserves the boldness while delivering a silk‑smooth texture.
Okay, ready for the game‑changer? I’m about to walk you through every single step—by the end, you’ll wonder how you ever made an iced mocha any other way. And stay with me here — this is worth it. The technique I’m about to reveal will have you impressing friends, family, and even that skeptical coworker who thinks “coffee drinks are just for mornings.” Let’s dive in and make a beverage that’s hands down the best version you’ll ever make at home.
What Makes This Version Stand Out
- Bold Flavor: The combination of espresso‑strength coffee and premium cocoa powder creates a depth that rivals any café‑made mocha, delivering a robust taste that wakes up your palate without overwhelming sweetness.
- Creamy Texture: A splash of heavy cream and whole milk gives the drink a silk‑like mouthfeel that coats your tongue like velvet, making each sip a luxurious experience.
- Simplicity: Only seven core ingredients are needed, and the entire process takes under ten minutes once your coffee is brewed—no fancy equipment required.
- Unique Twist: Shaking the mixture in a mason jar creates a micro‑foam that looks café‑professional without a frother, and the vanilla extract adds a subtle aromatic layer most recipes overlook.
- Crowd‑Pleaser: I’ve served this at brunches, picnics, and late‑night study sessions, and it consistently earns rave reviews—people keep asking for the recipe, and I’m happy to oblige.
- Ingredient Quality: Using freshly ground beans and high‑cocoa‑content chocolate ensures the flavor shines, while the optional whipped‑cream topping adds an indulgent finish.
- Make‑Ahead Potential: The coffee‑chocolate base can be prepared in advance and stored in the fridge, letting you assemble the final drink in seconds when the craving hits.
- Season‑Proof: Whether it’s a scorching July afternoon or a crisp November morning, this iced mocha adapts—swap oat milk for almond milk for a dairy‑free version, and you’ve got a year‑round staple.
Inside the Ingredient List
The Flavor Base
Strong brewed coffee (2 cups): This is the backbone of the mocha. I recommend a dark roast, freshly ground, brewed just off the heat so it’s still hot enough to dissolve the cocoa. If you skip this step and use pre‑made cold brew, you’ll miss the subtle acidity that balances the chocolate. For a caffeine‑kick, swap half of the coffee for a shot of espresso.
Cocoa powder (3 tbsp): Unsweetened, high‑cocoa‑content powder gives you that deep chocolate flavor without extra sugar. It also adds a slight bitterness that pairs beautifully with the coffee’s natural notes. If you’re out of cocoa, a tablespoon of melted dark chocolate works, but expect a richer, slightly sweeter profile.
The Texture Crew
Whole milk (1 cup): Milk provides the creamy body and helps mellow the coffee’s bite. Whole milk is ideal because its fat content creates that luxurious mouthfeel. You can substitute oat milk for a dairy‑free version; just be aware that oat milk adds a subtle caramel note.
Heavy cream (½ cup): This is the secret weapon that turns an ordinary iced mocha into a velvety indulgence. The cream’s fat coats the tongue, making the drink feel richer and more satisfying. If you’re watching calories, you can reduce this to ¼ cup and add a splash of half‑and‑half.
The Sweet Spot
Sugar (3 tbsp) or alternative sweetener: Adjust to taste. I use granulated sugar because it dissolves quickly in the hot coffee, but maple syrup or agave work well for a different flavor nuance. Skipping sweetener entirely will let the coffee’s bitterness dominate, which isn’t the experience we’re aiming for.
Vanilla extract (1 tsp): A tiny amount of vanilla adds an aromatic depth that most recipes overlook. It rounds out the bitterness of coffee and cocoa, making the drink feel more cohesive. If you love caramel, a dash of caramel extract can replace vanilla for a new twist.
The Final Flourish
Ice cubes (2 cups): The ice not only chills the drink but also dilutes it just enough to make it sip‑friendly. Use large cubes to slow dilution, preserving flavor longer. If you prefer a slushy texture, blend the ice with the other ingredients.
Whipped cream (optional, for topping): A dollop of freshly whipped cream adds a cloud‑like finish and a visual wow factor. I like to sweeten it lightly with a pinch of powdered sugar and a drop of vanilla.
Chocolate shavings (optional, for garnish): A few dark chocolate curls on top add a sophisticated look and an extra burst of chocolate flavor as you sip.
Everything’s prepped? Good. Let’s get into the real action…
The Method — Step by Step
-
Start by brewing 2 cups of strong coffee. I like to use a French press: add coarsely ground dark roast beans, pour hot water just off the boil, and let it steep for four minutes. The aroma that fills your kitchen at this point is pure anticipation; you’ll hear a faint bubbling as the coffee releases its oils. Once brewed, set the coffee aside to cool for about five minutes—this is crucial because it prevents the cocoa from clumping.
Kitchen Hack: Pour the hot coffee into a wide, shallow pan to speed up cooling. The larger surface area lets steam escape faster, getting you to the next step sooner. -
While the coffee cools, combine the cocoa powder and sugar in a small bowl. Add a splash of the hot coffee—just enough to create a thick paste. Stir vigorously until the mixture is smooth and glossy; this “chocolate slurry” should have no lumps. The scent at this stage is intoxicating, a sweet‑bitter perfume that signals you’re on the right track.
-
In a large mixing jar (or the zip‑top bag mentioned earlier), pour the cooled coffee, the cocoa‑sugar paste, whole milk, heavy cream, and vanilla extract. Seal the container tightly—this is the moment of truth. Give it a good shake for about 45 seconds. You’ll notice the mixture turning a deep, luxurious brown and a frothy head forming on top, like a miniature latte cloud.
Watch Out: If you over‑shake, the foam can become too airy and collapse when poured over ice. Stop shaking once you see a thick, velvety foam. -
Fill four tall glasses halfway with ice cubes. The ice should be enough to chill the drink without drowning it—large cubes work best because they melt slower, preserving the flavor. As you add the ice, you’ll hear a satisfying clink that signals the drink is about to become refreshingly cold.
-
Pour the shaken coffee‑chocolate mixture over the ice, allowing the foam to sit on top. The liquid should cascade in a silky ribbon, and the foam will sit like a crown. At this point, give the glass a gentle stir with a straw or spoon to blend the flavors just enough to create a marbled swirl.
-
If you love extra decadence, top each glass with a generous dollop of whipped cream. I like to pipe it in a swirl using a pastry bag; the visual impact is instant. Then, sprinkle chocolate shavings over the whipped cream for that final flourish. The aroma of fresh whipped cream mingles with the coffee, creating a multi‑layered scent experience.
-
Serve immediately with a straw or a long spoon. The first sip should hit you with a burst of cold, chocolatey coffee, followed by the creamy undertones of milk and cream. Notice how the foam slowly integrates, giving the drink a dynamic texture that evolves as you drink.
-
Enjoy! And if you’re feeling adventurous, try adding a pinch of sea salt on top of the whipped cream—this contrast amplifies the chocolate flavor and makes the drink feel like a gourmet dessert.
Kitchen Hack: Keep a spare jar of the coffee‑chocolate base in the fridge. When the next craving hits, just shake, pour over ice, and you’re done in under two minutes.
That's it — you did it. But hold on, I've got a few more tricks that'll take this to another level…
Insider Tricks for Flawless Results
The Temperature Rule Nobody Follows
Never pour boiling coffee directly into the cocoa‑sugar mix. Let the coffee sit at around 140°F (60°C). This temperature is hot enough to dissolve the cocoa fully but cool enough to keep the chocolate from seizing. I once ignored this rule and ended up with a gritty texture that ruined the whole drink.
Why Your Nose Knows Best
Before you add the vanilla, take a moment to inhale the coffee‑cocoa mixture. If you detect a burnt note, it means the coffee was too hot when mixed, and you should let it cool a few more minutes. Trust your nose; it’s a more reliable indicator than a thermometer.
The 5‑Minute Rest That Changes Everything
After shaking the mixture, let it rest for five minutes in the fridge. This short chill allows the foam to stabilize, resulting in a smoother pour and a thicker head. Skipping this step leads to a watery top that disappears too quickly.
Ice Cube Size Matters
Use large, solid ice cubes rather than crushed ice. Larger cubes melt slower, keeping your mocha from becoming diluted. If you love an extra‑cold drink, freeze coffee in ice cube trays and use those cubes for an intensified flavor.
Whipped Cream Consistency
When whipping cream, add a pinch of powdered sugar and a splash of vanilla. Whip until soft peaks form—over‑whipping creates a butter‑like texture that’s too dense for this drink. A quick tip: chill the mixing bowl and beaters for best results.
Creative Twists and Variations
This recipe is a playground. Here are some of my favorite ways to switch things up:
Minty Mocha Chill
Add a few fresh mint leaves to the shaker before shaking, or swap vanilla for ½ tsp of peppermint extract. The result is a refreshing, cool‑mint finish that pairs wonderfully with the chocolate.
Spiced Autumn Mocha
Introduce a pinch of ground cinnamon, nutmeg, and a dash of pumpkin spice to the cocoa‑sugar mix. This variation is perfect for cooler evenings and gives the drink a warm, comforting aroma.
Protein‑Packed Mocha
Blend in a scoop of vanilla whey protein or a tablespoon of almond butter after shaking. The added protein turns the drink into a post‑workout treat without sacrificing flavor.
Cold Brew Version
If you prefer a smoother, less acidic base, substitute the brewed coffee with cold brew concentrate. Reduce the sugar slightly, as cold brew is naturally sweeter.
Vegan Delight
Swap heavy cream for coconut cream and use almond milk instead of whole milk. Top with a dollop of coconut whipped cream and a drizzle of agave for a fully plant‑based indulgence.
Adult‑Only Mocha
Add a splash of coffee‑flavored liqueur, such as Kahlúa, or a shot of bourbon for an after‑dinner treat. The alcohol amplifies the richness and adds a subtle warmth.
Storing and Bringing It Back to Life
Fridge Storage
The coffee‑chocolate base can be stored in an airtight jar in the refrigerator for up to three days. Keep it sealed tightly to prevent oxidation, which can dull the chocolate flavor. Before using, give the jar a gentle shake to recombine any settled ingredients.
Freezer Friendly
If you want to batch‑make the base for a busy week, freeze it in individual portions using silicone ice cube trays. Once frozen, transfer the cubes to a zip‑top bag. When you’re ready, blend a frozen cube with fresh milk and ice for an ultra‑smooth, slushy mocha.
Best Reheating Method
When you need to warm the base for a hot mocha variant, place the desired amount in a saucepan over low heat, stirring constantly. Add a tiny splash of water (about a tablespoon) before reheating; the steam helps revive the silky texture and prevents the mixture from thickening too much.