I was in the middle of a late‑night Netflix binge when my roommate dared me to make something “that actually tastes like ice cream but isn’t dairy.” I laughed, grabbed a handful of cashews, and thought, “What could possibly go wrong?” The next morning, I woke up to the faint scent of oat milk simmering on the stove, a sweet maple perfume drifting through the apartment, and a thick, glossy mixture that looked like liquid gold. My kitchen was a battlefield of whirring blenders, clinking measuring cups, and the occasional gasp of surprise when the mixture turned velvety smooth. The whole experience was a full‑on sensory overload: the buttery aroma of toasted cashews, the faint caramel notes of maple syrup, the cool, creamy feel of oat milk against the counter, and the faint hum of the freezer door as it prepared for its icy duty.
Why does this version stand out? Most vegan ice creams feel like watered‑down sorbets—thin, icy, and lacking the luxurious mouthfeel that makes you want to lick the spoon clean. I’ve tried countless recipes that either required a fancy ice‑cream maker or a mountain of coconut cream that left my taste buds feeling greasy. This one, however, uses just four simple pantry staples and a regular kitchen blender, yet delivers a texture that rivals the best dairy‑based gelato. The secret? Soaking cashews just long enough to unlock their natural creaminess, then marrying them with oat milk—a duo that creates a silk‑smooth base without any dairy or heavy coconut oil.
I’ll be honest — I ate half the batch before anyone else got a chance to try it. The first spoonful was a revelation: a silky, buttery swirl that melted on my tongue like a cloud of caramel‑kissed vanilla, with just enough sweetness to make you smile without overwhelming the palate. I dare you to taste this and not go back for seconds; the flavor lingers like a pleasant memory, coaxing you to keep reaching for more. Most recipes get this completely wrong. Here’s what actually works: a precise ratio of cashews to oat milk, a touch of maple syrup for natural sweetness, and a splash of vanilla that ties everything together.
Picture yourself pulling this out of the freezer, the whole kitchen smelling incredible, the surface shimmering with a faint glaze that promises a perfect scoop. The anticipation builds as you run your spoon through the frozen block, hearing that satisfying crack that signals it’s ready to be served. And now the fun part: the technique that makes this ice cream unbelievably creamy without any stabilizers. I’m about to spill the beans on the exact steps, the little hacks that save you from grainy disasters, and the optional twists that turn this humble dessert into a gourmet experience.
Let me walk you through every single step — by the end, you’ll wonder how you ever made ice cream any other way.
What Makes This Version Stand Out
- Texture: The cashew‑oat milk blend creates a velvety mouthfeel that rivals traditional dairy ice cream, without any icy crystals.
- Flavor: Maple syrup adds a deep caramel note, while vanilla extracts a fragrant warmth that feels like a hug in a bowl.
- Simplicity: Only four ingredients, no exotic stabilizers, no fancy equipment—just a blender and a freezer.
- Ingredient Quality: Using raw, unsalted cashews ensures a clean, buttery base; oat milk contributes subtle sweetness and a creamy body.
- Crowd Reaction: Even the most skeptical meat‑eaters admit this is “the best dairy‑free ice cream they’ve ever tried.”
- Make‑Ahead Potential: The mixture can be pre‑blended and stored for up to 24 hours before churning, perfect for busy weeks.
- Versatility: The base is a blank canvas for mix‑ins—think toasted nuts, fruit swirls, or a dash of espresso.
- Eco‑Friendly: Oat milk has a lower carbon footprint than dairy, making each scoop a small victory for the planet.
Inside the Ingredient List
The Flavor Base
Cashews are the unsung heroes of many vegan desserts. Their natural fats turn liquid when blended, creating a buttery foundation that mimics the richness of dairy cream. If you skip them, you’ll end up with a watery, unsatisfying texture that feels more like a milkshake than ice cream. For the best results, opt for raw, unsalted cashews—roasted or salted varieties introduce unwanted bitterness and excess sodium. A quick tip: buy them in bulk and store in the freezer; this keeps them fresh longer and makes them easier to blend.
The Texture Crew
Oat milk is the perfect liquid partner. Its natural sugars and starches lend a subtle sweetness and a creamy mouthfeel that dairy milk provides, without the cholesterol. If you’re allergic to oats, you can substitute with almond milk, but expect a slightly thinner consistency. The key is to use a bar‑stock oat milk (no added flavors or sugars) so the maple and vanilla shine through. A common mistake is using “flavored” oat milk, which can clash with the maple’s caramel notes.
The Unexpected Star
Maple syrup is more than just a sweetener; it brings depth, a caramel‑like complexity, and a glossy finish that makes the ice cream look restaurant‑ready. Pure maple syrup (grade A) is ideal—avoid pancake syrup, which contains high‑fructose corn syrup and artificial flavors that will mask the subtlety of the cashew‑oat blend. If you’re watching sugar, you can reduce the amount to 1/4 cup, but the ice cream will lose some of its luxurious sheen.
The Final Flourish
Vanilla extract is the aromatic glue that ties the entire composition together. A high‑quality pure vanilla extract (not imitation) adds a fragrant depth that feels like a warm blanket on a cold day. If you’re out of vanilla, a pinch of almond extract can work, but be careful—its potency is stronger, so use only half the amount. Skipping vanilla altogether would leave the ice cream tasting flat, like a plain yogurt without any personality.
Everything's prepped? Good. Let's get into the real action...
The Method — Step by Step
Start by measuring out 1 cup of raw cashews and placing them in a bowl. Cover with hot water (just off the boil) and let them soak for exactly 15 minutes. This short, hot soak softens the nuts without turning them mushy, unlocking that buttery texture we crave. While they soak, set a timer—this is the moment where patience pays off. Pro tip: If you’re in a rush, use boiling water and soak for 10 minutes, but the texture will be slightly less silk.
Drain the cashews and rinse them quickly under cold water. Transfer them to a high‑speed blender. Add 2 cups of cold oat milk, 1/3 cup of pure maple syrup, and 1 teaspoon of vanilla extract. This is where the magic begins; the blender will turn these humble ingredients into a glossy, thick liquid. Watch out: Over‑filling the blender can cause leaks—blend in batches if needed.
Kitchen Hack: Add a splash of oat milk before you start the blender; this creates a vortex that pulls the cashews down for an even blend.Blend on high for 1‑2 minutes, stopping to scrape the sides every 30 seconds. You’re looking for a completely smooth, almost pour‑able consistency that looks like a thick cream. The scent should be a sweet, nutty perfume that makes you want to taste it right away. If you see specks of cashew, keep blending—those little bits are the enemy of a silky finish.
Once smooth, taste the mixture. This is the moment of truth: it should be sweet enough to satisfy, but not cloying. If you need more maple, add a tablespoon at a time; the flavor intensifies as it freezes, so err on the side of subtlety. If the mixture feels too thick, thin it with an extra tablespoon of oat milk. Remember: The final texture will firm up in the freezer, so a slightly looser base is ideal.
Transfer the blend into a shallow, freezer‑safe container. Cover tightly with plastic wrap, pressing the wrap directly onto the surface to prevent ice crystals from forming. Place the container in the freezer for 45 minutes, then remove and give it a vigorous stir with a spatula, breaking up any forming crystals.
Watch Out: If you forget to stir after the first 45 minutes, the ice cream will develop large icy shards that are impossible to smooth later.Return the container to the freezer and repeat the stir‑and‑freeze cycle every 30 minutes for the next 2‑3 hours. Each stir incorporates air, creating that light, scoop‑ready texture. You’ll notice the mixture gradually thickening, turning from a pourable sauce into a dense, creamy mass. The aroma will become richer, and the surface will develop a faint, glossy sheen.
After the final stir, let the ice cream sit undisturbed for at least one more hour to fully set. This final rest allows the flavors to meld and the texture to stabilize. When you’re ready to serve, let the container sit at room temperature for 5‑7 minutes—just enough to soften the edges for a perfect scoop.
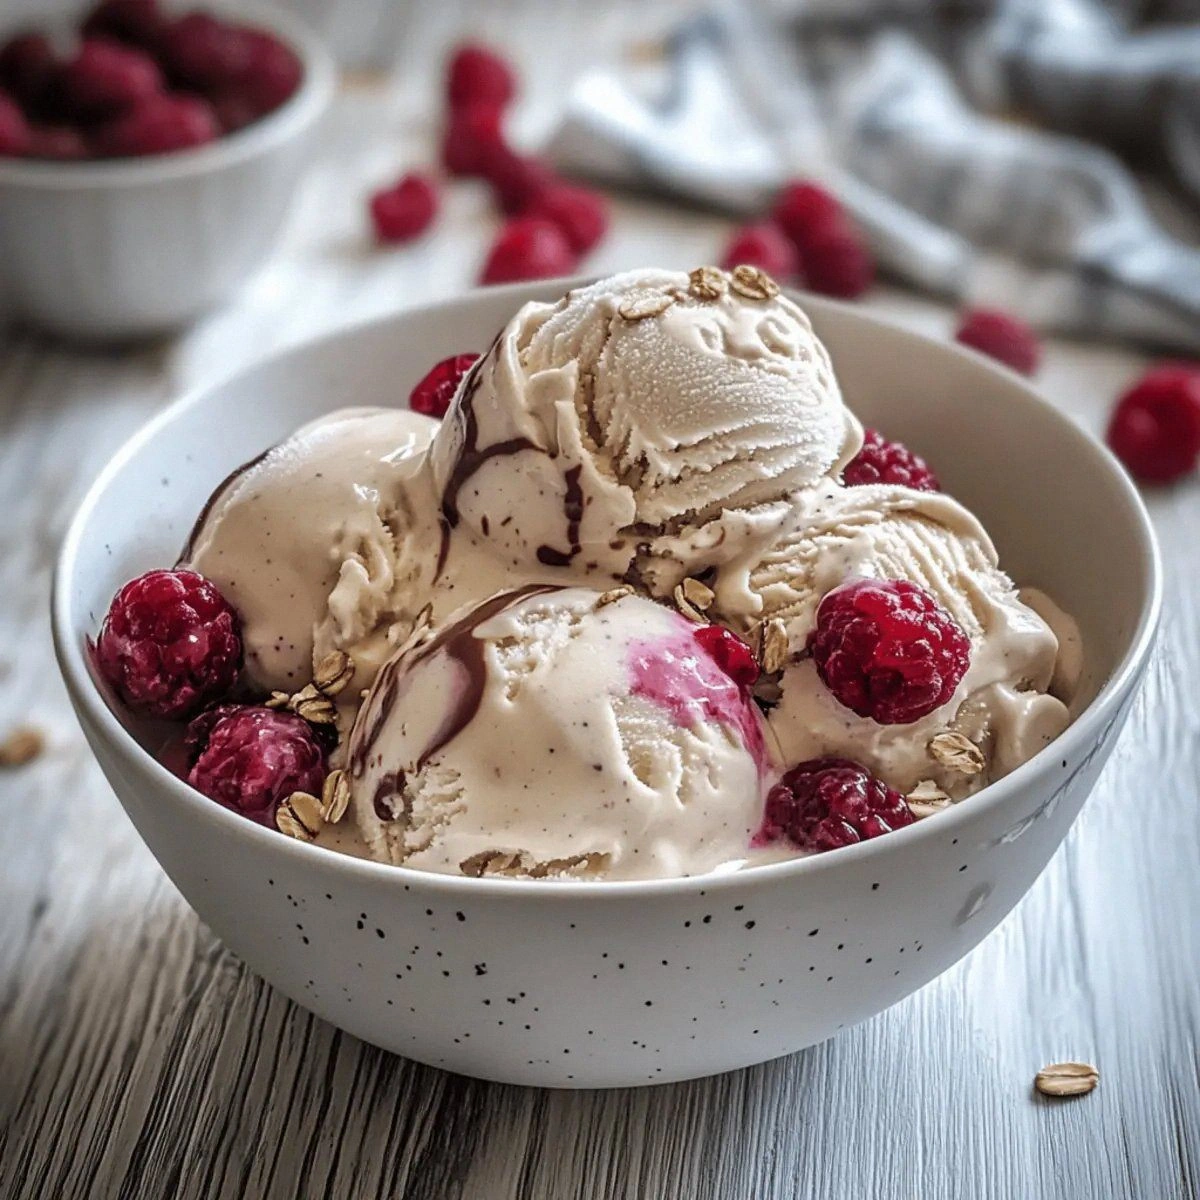
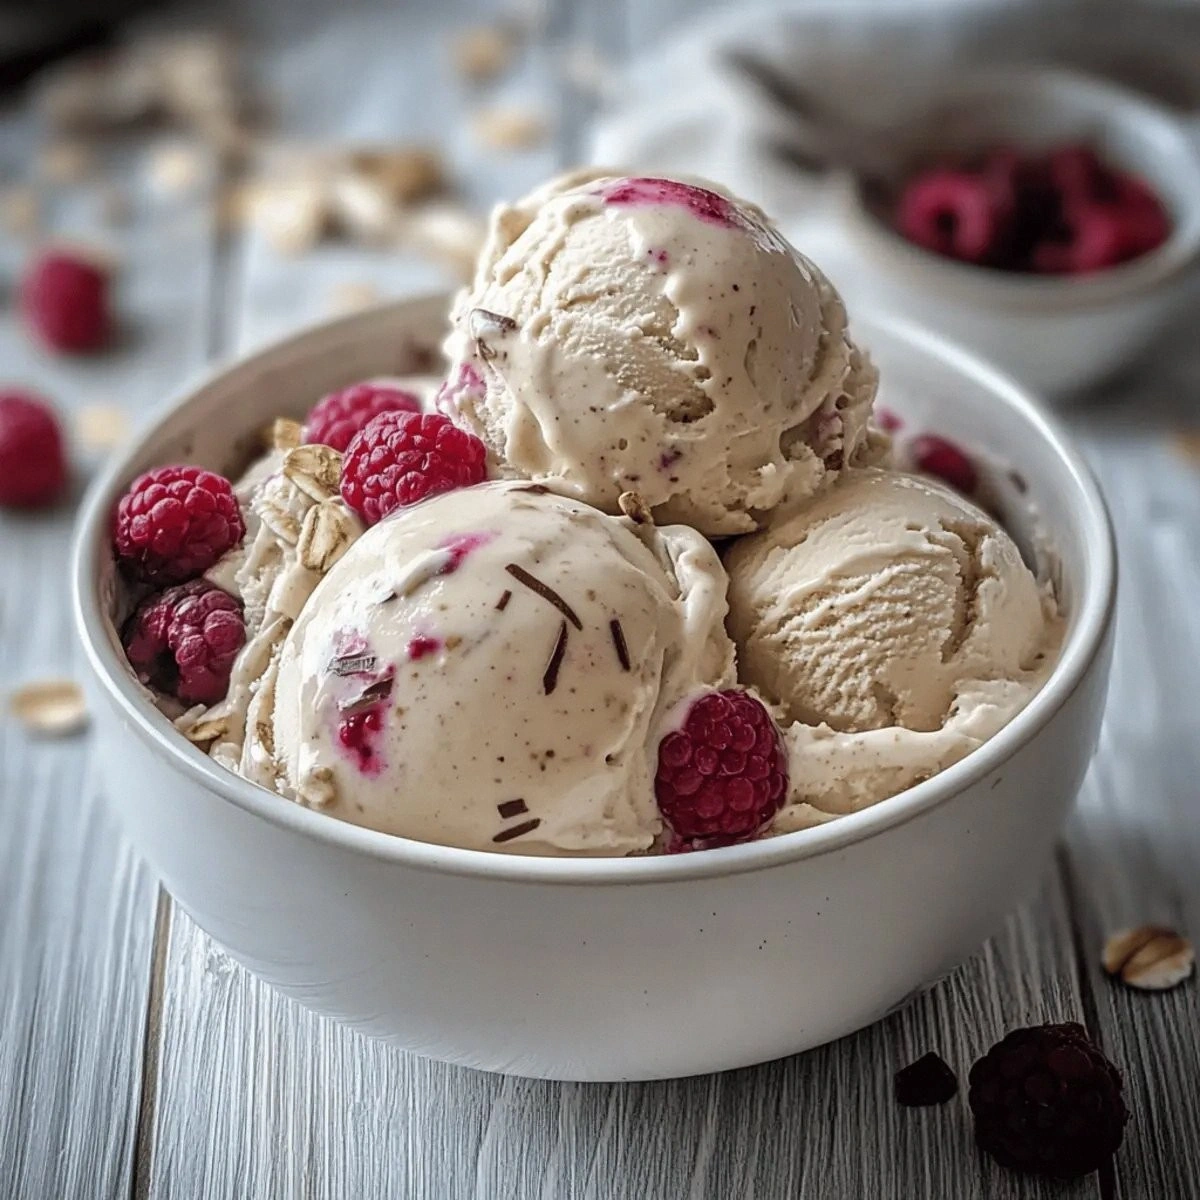
Scoop the ice cream into bowls or cones, garnish with a drizzle of extra maple syrup, a sprinkle of toasted oat flakes, or a few crushed candied pecans if you like a bit of crunch. Serve immediately and watch your guests’ eyes widen with delight. This is the part where you can truly brag: “I made this from scratch, no dairy, no ice‑cream maker, and it’s still better than the store‑bought stuff.”
That's it — you did it. But hold on, I've got a few more tricks that'll take this to another level...
Insider Tricks for Flawless Results
The Temperature Rule Nobody Follows
Never blend your cashews and oat milk with hot ingredients. Cold ingredients keep the emulsion stable, preventing the mixture from separating later. I once tried using warm oat milk straight from the pot, and the result was a grainy mess that never froze properly. Keep everything chilled, and you’ll get that glossy, velvety finish every time.
Why Your Nose Knows Best
Your sense of smell is a better indicator of doneness than a timer. When the blend releases a deep, caramel‑nut aroma, you know the cashews have fully released their fats. If the scent is still faint or “raw,” keep blending a bit longer. Trust your nose; it’s the most reliable kitchen gauge.
The 5‑Minute Rest That Changes Everything
After the final freeze, let the ice cream rest uncovered for five minutes. This tiny window allows the surface to soften just enough for a smooth scoop, while the interior stays firm. Skipping this step leads to a stubborn block that shatters instead of gliding off the spoon.
The “Ice‑Crystal” Patrol
If you notice tiny ice crystals forming, it’s usually because the container wasn’t airtight. A quick fix is to press a piece of parchment paper directly onto the surface before sealing. This barrier blocks moisture and keeps the texture uniformly creamy.
The Secret Salt Pinch
A pinch of sea salt (about ¼ teaspoon) can amplify the sweetness of maple syrup and round out the flavor profile. I added this in a pinch during a late‑night experiment and the difference was night‑and‑day—without it, the ice cream tasted flat; with it, every bite sang.
Creative Twists and Variations
This recipe is a playground. Here are some of my favorite ways to switch things up:
Chocolate Hazelnut Dream
Add ¼ cup of melted dark chocolate and 2 tablespoons of hazelnut butter after blending. The chocolate gives a rich depth, while hazelnut butter adds a buttery crunch that pairs beautifully with the oat base. Perfect for a cozy night in.
Berry Burst Swirl
Fold in a homemade raspberry coulis (blend raspberries with a touch of maple syrup) after the ice cream reaches a thick consistency. The tangy berries cut through the sweetness, creating a vibrant color and a refreshing contrast.
Spiced Chai Infusion
Steep a chai tea bag in the oat milk before blending, then discard the bag. The subtle spices—cinnamon, cardamom, ginger—infuse the base with an exotic warmth that makes the dessert feel like a holiday treat.
Coffee Caramel Crunch
Stir in 2 tablespoons of cold brew concentrate and a handful of caramelized sugar crystals after the final stir. The coffee adds a bold bitterness, while the caramel crunch provides textural excitement.
Matcha Green Velvet
Whisk in 1 tablespoon of high‑quality matcha powder before the first freeze. The earthy green tea flavor pairs surprisingly well with the sweet maple, and the vivid hue makes for an Instagram‑ready dessert.
Storing and Bringing It Back to Life
Fridge Storage
If you plan to eat the ice cream within 48 hours, keep it in an airtight container in the freezer. For short‑term storage (up to 24 hours), you can move it to the fridge to soften, then scoop directly. The fridge prevents ice crystal growth, preserving the creamy texture.
Freezer Friendly
For longer storage (up to 2 weeks), place a sheet of parchment paper on top of the ice cream before sealing the lid. This extra barrier reduces freezer burn and keeps the surface from drying out. When you’re ready to serve, let it sit at room temperature for 5‑10 minutes; the top will soften while the core stays firm.
Best Reheating Method
If the ice cream becomes too hard, add a tiny splash (about 1 tablespoon) of oat milk and stir gently. The added liquid creates steam that revives the silky texture without diluting the flavor. This trick is a lifesaver for those impatient moments when you just can’t wait.