I once found myself standing in a kitchen that smelled like a burnt-out fireplace, the result of a misguided attempt to “improve” a classic gingerbread recipe. My cousin had dared me to create something that would make the whole neighborhood peek through their curtains, sniff, and immediately think, “That’s the scent of Christmas itself.” The batter I mixed was a sticky, dark swamp of molasses and spices that clung to the spoon like a mischievous elf, and I swear the oven timer laughed at me as it counted down. I tasted the raw dough—sweet, spicy, a little bitter—and realized I was holding a future holiday legend in my hands.
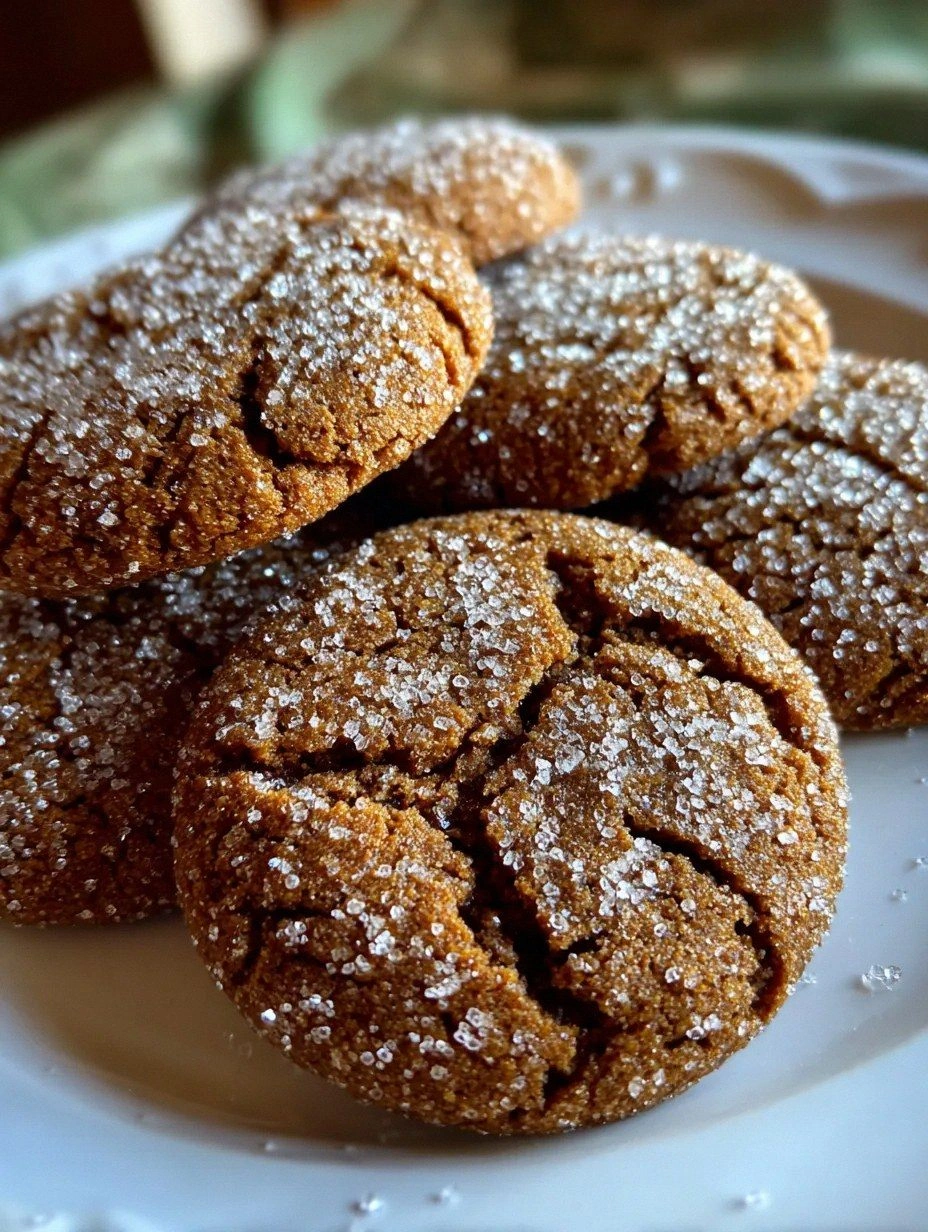
Fast forward to a chilly December evening, the kind where the wind whistles against the windowpanes and the house is lit by flickering candlelight. I rolled out the dough, feeling the cool, buttery texture under my fingertips, and cut out perfect little discs that reminded me of tiny, polished ornaments. As they baked, the kitchen filled with a chorus of aromas: the sharp zing of ginger, the warm hug of molasses, a whisper of cinnamon that seemed to wrap around the room like a cozy blanket. The sound of the timer chiming was like a choir announcing the arrival of the holidays, and when I pulled the cookies out, they were golden‑brown edges with a glossy, caramelized center that glistened like freshly fallen snow.
What makes this version a true holiday favorite? It’s not just the ingredients, but the method—a delicate balance of creaming butter to a cloud‑like fluff, letting the molasses mingle with the spices just long enough to release its deep, earthy notes, and then chilling the dough so the flavors marry overnight. Most recipes get this completely wrong: they either over‑mix, resulting in tough cookies, or under‑season, leaving the spices mute. Here, every step is calibrated to coax out the best from each component, and the result is a cookie that’s crisp on the edges, chewy in the middle, and fragrant enough to warm the soul.
I’m about to spill the secret that most home bakers miss—a splash of orange zest that lifts the molasses and a brief rest in the fridge that lets the gluten relax, creating that melt‑in‑your‑mouth texture. I dare you to taste this and not go back for seconds; I’ll be honest — I ate half the batch before anyone else got to try it. Let me walk you through every single step — by the end, you’ll wonder how you ever made it any other way.
What Makes This Version Stand Out
- Deep Flavor: The combination of dark molasses and freshly ground ginger creates a taste that feels like a warm hug from an old friend, with each bite delivering a layered spice profile that lingers on the palate.
- Perfect Texture: By chilling the dough for at least an hour, the cookies develop a crisp edge that shatters like thin ice while the center stays soft and chewy, offering a satisfying contrast.
- Simplicity: Only eleven pantry staples are needed, and the method avoids any fancy equipment—just a mixing bowl, a spoon, and a good old oven.
- Unique Twist: A dash of orange zest adds a bright citrus note that lifts the deep molasses, a secret that most recipes overlook.
- Crowd‑Pleaser: These cookies have become the unofficial “welcome” treat at every holiday gathering I attend; guests line up for seconds and often ask for the recipe.
- Ingredient Quality: Using unsulphured molasses and high‑quality butter makes a noticeable difference in both flavor depth and mouthfeel.
- Cooking Method: Baking at a moderate 350°F ensures even caramelization without burning the delicate spices, delivering that perfect golden hue.
- Make‑Ahead Potential: The dough can be frozen for up to a month, and the baked cookies keep fresh for weeks, making holiday prep a breeze.
Inside the Ingredient List
The Flavor Base
Molasses is the heart of these cookies, providing a deep, almost smoky sweetness that pairs perfectly with warm spices. Choose unsulphured molasses for a richer flavor; the sulphured versions can taste slightly bitter. If you substitute honey, you’ll lose that characteristic dark note, though the cookies will still be tasty.
Ginger: Freshly ground ginger offers a bright, peppery kick that cuts through the sweetness. If you only have ground ginger, use it sparingly—its potency can vary widely. For an extra zing, grate a tiny piece of fresh ginger into the dough.
The Texture Crew
All‑purpose flour forms the structural backbone, but the key is not to over‑mix once the flour is added. Over‑mixing develops gluten, leading to a tough cookie rather than a melt‑in‑your‑mouth one. Sifting the flour with the leavening agents ensures an even distribution and a lighter crumb.
Butter: Softened, unsalted butter creates a tender crumb and carries the flavors of the spices. Using melted butter would make the cookies spread too much, while cold butter would result in a crumbly texture.
Brown Sugar: Its moisture content keeps the cookies chewy, and the molasses in the sugar adds another layer of depth. If you prefer a crisper edge, you can replace half of the brown sugar with white sugar.
The Unexpected Star
Orange Zest: A teaspoon of freshly grated orange zest lifts the heavy molasses, adding a citrus sparkle that brightens the whole palate. It’s a tiny addition that makes a massive difference, especially when paired with the warm spices.
Vanilla Extract: Pure vanilla balances the earthiness of the molasses and adds a subtle sweetness. Always opt for pure extract over imitation; the latter can taste flat and cheap.
The Final Flourish
Baking Soda: This leavening agent reacts with the acidity of molasses, giving the cookies a slight rise and a tender interior. Too much will cause them to spread excessively, so measure carefully.
Salt: A pinch of salt amplifies the flavors, preventing the sweetness from becoming cloying. If you’re using salted butter, reduce the added salt accordingly.
Egg: The egg binds everything together, providing structure without making the cookies cakey. For a richer flavor, you can use a large egg yolk only, but expect a denser texture.
Everything's prepped? Good. Let’s get into the real action...
The Method — Step by Step
-
Start by preheating your oven to 350°F (175°C) and line two baking sheets with parchment paper. While the oven warms, take a large mixing bowl and cream together the softened butter and dark brown sugar until the mixture is light, fluffy, and has doubled in volume. This process should take about 3‑4 minutes with an electric mixer on medium speed; you’ll hear a faint “whoosh” as air is incorporated, and the mixture will look almost like a pale cloud.
Kitchen Hack: Add the molasses and orange zest to the butter‑sugar mixture while the mixer is still running. This ensures a smooth, glossy batter without any lumps. -
Add the egg and vanilla extract to the creamed butter, beating until fully incorporated. The batter should become silky, and you’ll notice a faint, sweet aroma as the vanilla mingles with the butter. If the mixture looks curdled, keep mixing for another 30 seconds; the emulsification will smooth it out.
-
In a separate bowl, whisk together the flour, ground ginger, cinnamon, cloves, baking soda, and salt. This dry blend not only distributes the spices evenly but also prevents clumps of baking soda that could cause uneven rising. Once whisked, set the bowl aside; you’ll hear a soft, satisfying “swoosh” as the flour aerates.
Watch Out: When adding the dry ingredients, do it in two batches. Adding all at once can cause the dough to become overly dense, leading to hard cookies. -
Gradually fold the dry mixture into the wet batter, using a rubber spatula and a gentle hand. Scrape the sides of the bowl to ensure everything is incorporated, but avoid over‑mixing; the moment the flour disappears, stop. The dough should be thick, slightly sticky, and have a deep mahogany hue that hints at the molasses richness.
-
Cover the bowl with plastic wrap and place it in the refrigerator for at least 60 minutes. This chilling step is crucial—it allows the gluten to relax and the flavors to meld, resulting in cookies that spread just enough and have a tender crumb. If you’re in a hurry, a 30‑minute chill will still work, but the texture won’t be as perfect.
Kitchen Hack: Place a sheet of parchment paper on top of the dough before sealing the wrap. This prevents the dough from drying out and makes it easier to scoop later. -
While the dough chills, prepare a small bowl of granulated sugar mixed with a pinch of cinnamon. This will be used to coat the tops of the cookies before baking, adding an extra crunchy sparkle.
-
Once the dough is firm, scoop out tablespoon‑sized balls using a cookie scoop or a spoon. Roll each ball between your palms to smooth it out, then roll it lightly in the cinnamon‑sugar mixture. Place the coated balls onto the prepared baking sheets, spacing them about 2 inches apart; they will spread modestly as they bake.
-
Slide the trays into the preheated oven and bake for 12‑14 minutes, or until the edges are a deep amber and the centers still look slightly soft. The cookies will continue to set as they cool, so pull them out just when the edges start to turn golden. You’ll hear a faint “crackle” as the molasses caramelizes, releasing an intoxicating aroma that fills the kitchen.
-
Allow the cookies to cool on the baking sheet for 5 minutes before transferring them to a wire rack. This short rest lets them firm up without becoming brittle. Once fully cooled, store them in an airtight container; they’ll stay soft for up to a week, and the scent will linger, reminding you of holiday cheer every time you open the lid.
That's it — you did it. But hold on, I've got a few more tricks that'll take this to another level...
Insider Tricks for Flawless Results
The Temperature Rule Nobody Follows
Always start with room‑temperature butter; cold butter will cause the dough to be crumbly, while melted butter spreads the cookies too thin. If your kitchen is particularly warm, pop the butter in the fridge for 15 minutes before creaming. This small temperature tweak ensures a consistent, buttery texture that holds its shape.
Why Your Nose Knows Best
When the dough is chilling, give it a quick sniff. If you detect a raw, floury scent, the dough needs a few more minutes in the fridge. Trusting your senses over the clock can save you from under‑developed flavors that taste flat.
The 5‑Minute Rest That Changes Everything
After pulling the cookies from the oven, let them rest on the sheet for exactly five minutes before moving them. This short pause lets the residual heat finish the cooking process, preventing a gummy center. A friend once skipped this step and ended up with cookies that were too soft to lift—let’s just say the floor was a sticky mess.
Spice Freshness Check
Ground spices lose potency after about 12 months. To test freshness, rub a pinch between your fingers and inhale; if the aroma is weak, replace them. Fresh spices give a brighter, more pronounced flavor that makes the cookies pop.
The Secret of the Citrus Boost
Add the orange zest at the very end of the mixing stage, right before the flour is folded in. This preserves the volatile citrus oils, ensuring they don’t evaporate during mixing. The result is a subtle brightness that cuts through the molasses richness.
Creative Twists and Variations
This recipe is a playground. Here are some of my favorite ways to switch things up:
Molasses‑Maple Fusion
Replace half of the molasses with pure maple syrup. The result is a lighter, sweeter cookie with a subtle maple undertone that pairs beautifully with the ginger.
Spiced Nut Crunch
Fold in ½ cup of chopped toasted walnuts or pecans during the final mixing stage. The nuts add a satisfying crunch and an extra layer of nutty flavor that complements the spices.
Chocolate‑Dipped Delight
Once the cookies have cooled, dip half of each cookie in dark chocolate and let the chocolate set. The bitter chocolate contrasts the sweet molasses, creating an elegant bite.
Cranberry Burst
Stir in ¼ cup of dried cranberries for a tart pop that brightens the deep flavors. The cranberries also add a festive ruby hue, perfect for holiday platters.
Gluten‑Free Adaptation
Swap the all‑purpose flour for a 1:1 gluten‑free flour blend, and add 1 tablespoon of xanthan gum. The texture remains chewy, and everyone at the table can enjoy them.
Spiced Espresso Kick
Dissolve 1 teaspoon of instant espresso powder in the molasses before adding it to the butter. This gives the cookies a subtle coffee note that deepens the molasses flavor.
Storing and Bringing It Back to Life
Fridge Storage
Place the cooled cookies in an airtight tin with a parchment sheet between layers. They’ll stay soft for up to two weeks in the refrigerator. For extra freshness, add a slice of fresh apple to the container; the apple’s moisture helps keep the cookies from drying out.
Freezer Friendly
Separate the cookies with wax paper, then pack them in a zip‑top freezer bag. They freeze beautifully for up to three months. When you’re ready to enjoy them, let them thaw at room temperature for 15 minutes, then give them a quick 3‑minute warm‑up in a 300°F oven.
Best Reheating Method
To revive that fresh‑out‑of‑the‑oven softness, place the cookies on a baking sheet, splash a tiny droplet of water on each, and warm them for 5 minutes at 325°F. The steam generated re‑hydrates the interior while the edges crisp back up.