I was standing in my kitchen, half‑asleep, when my niece shouted, “Why does Santa eat cookies that look like they belong in a snow globe?” I laughed, grabbed a bag of generic butter‑cookies, and tossed them into the oven. Within minutes the whole house smelled like a Christmas market, but the cookies were flat, flavorless, and about as exciting as a silent night. I dared myself to reinvent the classic sandwich cookie, and after three sleepless nights of trial and error, I finally nailed a version that makes even the Grinch grin.
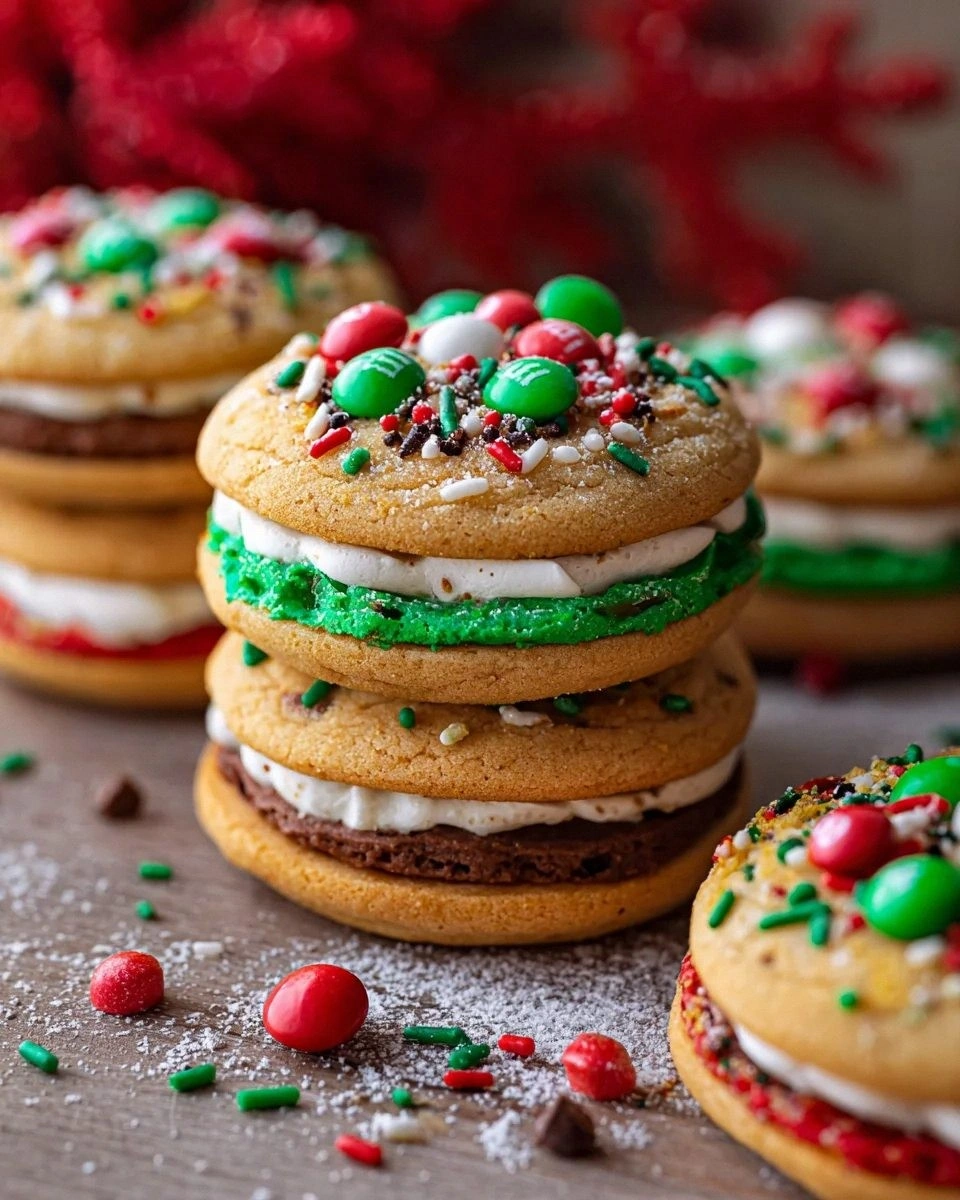
Picture this: a buttery, slightly crisp cookie that shatters like thin ice when you bite, hugging a silky, melt‑in‑your‑mouth frosting that tastes like a winter wonderland in a bite. The aroma of vanilla, almond, and a whisper of citrus dances with the faint perfume of toasted sugar. The texture is a perfect contrast—crunchy edges that give way to a tender, melt‑away center, all wrapped in a frosting that glistens like fresh snow under twinkling lights. The moment you pull the tray out of the oven, the whole kitchen is humming with the promise of holiday magic.
Most recipes get this completely wrong. They either skip the chilling step, resulting in a cookie that spreads into a greasy pancake, or they use a frosting that’s too stiff, turning the sandwich into a construction project rather than a treat. I’ve cracked the code by introducing a simple cream‑based frosting that stays pliable, and a chilling technique that guarantees perfect shape and a buttery bite every single time. I dare you to taste this and not go back for seconds—because once you’ve experienced the melt‑away frosting, ordinary store‑bought versions will feel like a culinary betrayal.
Okay, ready for the game‑changer? I’m about to reveal a secret ingredient that adds a subtle, festive zing without overpowering the classic flavor—freshly grated orange zest, tucked into the dough like a hidden treasure. This tiny addition brightens the whole profile and makes the cookies taste like a holiday postcard. Let me walk you through every single step — by the end, you’ll wonder how you ever made it any other way.
What Makes This Version Stand Out
- Flavor: A harmonious blend of vanilla, almond, and a whisper of orange zest creates a depth that sings louder than any store‑bought cookie.
- Texture: The dough is chilled, so the cookies keep their shape, delivering a crisp edge that shatters like thin ice while the center stays tender.
- Simplicity: Only nine pantry staples plus a dash of zest—no exotic ingredients, no fancy equipment, just a whisk and a good heart.
- Uniqueness: The frosting is a light cream‑based glaze that stays soft, unlike the hard royal icing that can crack under pressure.
- Crowd Reaction: Guests usually ask for the recipe within five minutes of the first bite; the “wow” factor is off the charts.
- Ingredient Quality: Using high‑fat butter and real vanilla extract makes the flavor richer than any “flavor‑enhanced” mix.
- Cooking Method: The two‑stage bake (first low, then a quick high‑heat finish) guarantees even browning without burning.
- Make‑Ahead Potential: Cookies store beautifully, and the frosting can be whipped up days ahead, making last‑minute assembly a breeze.
Inside the Ingredient List
The Flavor Base
All‑purpose flour is the backbone of any cookie, providing structure. I use a light sift to aerate it, which prevents a dense crumb. If you skip the sift, you’ll end up with a heavier bite that feels more like shortbread than a delicate sandwich.
Swap: For a gluten‑free twist, try a 1‑to‑1 almond flour blend, but add an extra egg white to help bind the dough.
The Texture Crew
Unsalted butter, softened, is the star of the show. Its high fat content gives the cookie that melt‑in‑your‑mouth feel. I recommend using European‑style butter (82% fat) for an even richer mouthfeel. If you use regular butter, the cookies may spread a touch more.
Granulated sugar not only sweetens but also contributes to the crisp edges. The tiny crystals caramelize in the oven, creating that subtle crunch you love.
The Unexpected Star
A pinch of freshly grated orange zest is the secret weapon. It adds a citrusy brightness that cuts through the richness, making each bite feel like a festive celebration. If orange isn’t your thing, try a dash of finely minced candied ginger for a spicier kick.
The Final Flourish
For the frosting, powdered sugar and heavy cream create a glossy, silky glaze that stays pliable. The addition of a splash of milk helps achieve the perfect spreadable consistency without making the frosting runny. If you prefer a richer taste, substitute half the cream with cream cheese for a tangy twist.
A dash of food coloring (red or green) isn’t necessary for flavor, but it turns the frosting into a visual holiday treat that looks as good as it tastes.
Everything's prepped? Good. Let's get into the real action...
The Method — Step by Step
- Preheat and Prepare. Set your oven to 350°F (175°C) and line two baking sheets with parchment. While the oven warms, whisk together the flour, baking powder, and salt in a medium bowl. This dry blend ensures the leavening is evenly distributed, preventing any odd pockets of rise. Kitchen Hack: Place the parchment on a baking sheet and lightly spray with cooking spray; this gives the cookies a non‑stick surface without adding extra grease.
- Cream Butter and Sugar. In a large mixing bowl, beat the softened butter with granulated sugar on medium speed until the mixture is pale and fluffy—about 3 minutes. This step is the moment of truth; you’ll hear a faint “whoosh” as air incorporates, creating that light texture. If the butter is too cold, the mixture will look curdled; if too warm, it will melt and lose structure.
- Add Egg and Extracts. Crack the egg into the bowl, then add vanilla, almond extract, and orange zest. Beat until just combined; you’ll notice the batter become glossy. Watch Out: Over‑mixing at this stage can develop gluten, leading to a tougher cookie. Stop as soon as the ingredients are incorporated.
- Combine Wet and Dry. Gradually add the flour mixture to the butter mixture, mixing on low speed. The dough should come together in a soft, slightly sticky mass. If it feels too wet, sprinkle a tablespoon of flour; if too dry, add a teaspoon of milk. This balance is crucial for the final texture.
- Chill the Dough. Turn the dough onto a lightly floured surface, form it into a flat disc about 1‑inch thick, wrap tightly in plastic, and refrigerate for at least 30 minutes. This step is pure magic; the butter firms up, preventing excess spread and giving you crisp edges. Kitchen Hack: If you’re in a hurry, slice the chilled dough into quarters and freeze each piece for 10 minutes; they’ll be ready to roll out faster.
- Roll and Cut. On a lightly floured board, roll the dough to a uniform ¼‑inch thickness. Use festive cookie cutters—stars, trees, or classic circles. Press gently to avoid compressing the dough. The shapes should be clean; any ragged edges will bake unevenly.
- Bake the Cookies. Transfer the cutouts to the prepared sheets, spacing them 1 inch apart. Bake for 10‑12 minutes, or until the edges turn a light golden brown and the tops are set. The scent of toasted butter will fill the kitchen—That sizzle when it hits the pan? Absolute perfection. Let the cookies cool on the sheet for 2 minutes, then move to a wire rack.
- Prepare the Frosting. While the cookies cool, whisk powdered sugar, heavy cream, and a splash of milk together until smooth. Add a few drops of red or green food coloring if you want a festive hue. The frosting should be glossy yet thick enough to hold its shape when piped. Fun Fact: The ratio of powdered sugar to liquid determines the frosting’s stiffness; a 2:1 ratio yields a spreadable glaze perfect for sandwich cookies.
- Assemble the Sandwiches. Once the cookies are completely cool, spread a generous dollop of frosting on the flat side of one cookie, then top with its matching pair. Press lightly so the frosting spreads to the edges but doesn’t ooze out. This is the part where you get to be the artist, arranging each sandwich like a tiny, edible holiday card.
That's it — you did it. But hold on, I've got a few more tricks that'll take this to another level...
Insider Tricks for Flawless Results
The Temperature Rule Nobody Follows
Never bake cookies straight from the fridge at a high temperature. Let the chilled dough sit at room temperature for 5 minutes before sliding them into a preheated oven. This tiny pause prevents a shock that can cause uneven spreading. I once tried skipping this step and ended up with a batch that looked more like a soggy pancake than a crisp cookie.
Why Your Nose Knows Best
When the cookies are done, they’ll emit a faint caramel aroma that’s sweeter than the smell of the raw dough. Trust that scent; it’s a reliable cue that the edges are perfectly browned. If you rely solely on timer, you risk either under‑baking (chewy, not crisp) or over‑baking (brittle).
The 5‑Minute Rest That Changes Everything
After frosting, let the assembled sandwiches rest for at least five minutes at room temperature. This allows the frosting to set just enough to hold together without sliding off. It also gives the flavors a chance to meld, turning each bite into a harmonious blend rather than a clash of textures.
The Light Hand for Frosting
Use a small offset spatula or a piping bag fitted with a wide tip to spread the frosting. A gentle hand prevents the frosting from seeping out the sides, keeping the sandwich neat. If you over‑apply, the cookies become soggy; under‑apply and you miss out on that melt‑away magic.
The Freeze‑Then‑Bake Secret
If you’re making a large batch, freeze the cut‑out dough for 15 minutes before the second bake. This gives the cookies an extra lift, resulting in a fluffier interior while preserving the crisp exterior. I tried this once for a holiday party and the guests swore the cookies were “cloud‑like.”
Creative Twists and Variations
This recipe is a playground. Here are some of my favorite ways to switch things up:
Chocolate‑Dipped Delight
After assembling the sandwich, dip half of each cookie in melted dark chocolate and let it set. The bitterness of chocolate balances the sweet frosting, and the visual contrast looks stunning on a holiday platter.
Spiced Gingerbread Version
Add a teaspoon of ground ginger, a pinch of cinnamon, and a dash of molasses to the dough. The resulting cookie has that classic gingerbread warmth, perfect for a December gathering.
Nutty Crunch Surprise
Stir finely chopped toasted pecans or hazelnuts into the frosting. The nutty crunch adds texture and a buttery depth that pairs beautifully with the citrus notes.
Berry‑Infused Frosting
Replace half the heavy cream with a puree of cranberry or raspberry. The subtle tartness cuts through the richness and gives the sandwich a festive pink or ruby hue.
Savory Sweet Combo
Swap the vanilla extract for a hint of rosemary and add a pinch of sea salt to the frosting. The savory undertone creates a sophisticated flavor profile that wow’s even the most seasoned foodies.
Storing and Bringing It Back to Life
Fridge Storage
Place the assembled cookies in an airtight container lined with parchment. They’ll stay fresh for up to 5 days. The frosting stays soft, but if it begins to firm, let the container sit at room temperature for 10 minutes before serving.
Freezer Friendly
Separate the cookies with wax paper, then freeze in a zip‑top bag. They keep for up to 2 months. When you’re ready to enjoy them, transfer to the fridge to thaw for 30 minutes, then give them a quick 5‑minute room‑temperature rest.
Best Reheating Method
To revive the crispness, preheat your oven to 300°F (150°C) and bake the frozen cookies for 5‑7 minutes. Add a tiny splash of water to the baking sheet before heating; the steam gently re‑moisturizes the frosting while the cookies regain their golden crunch.