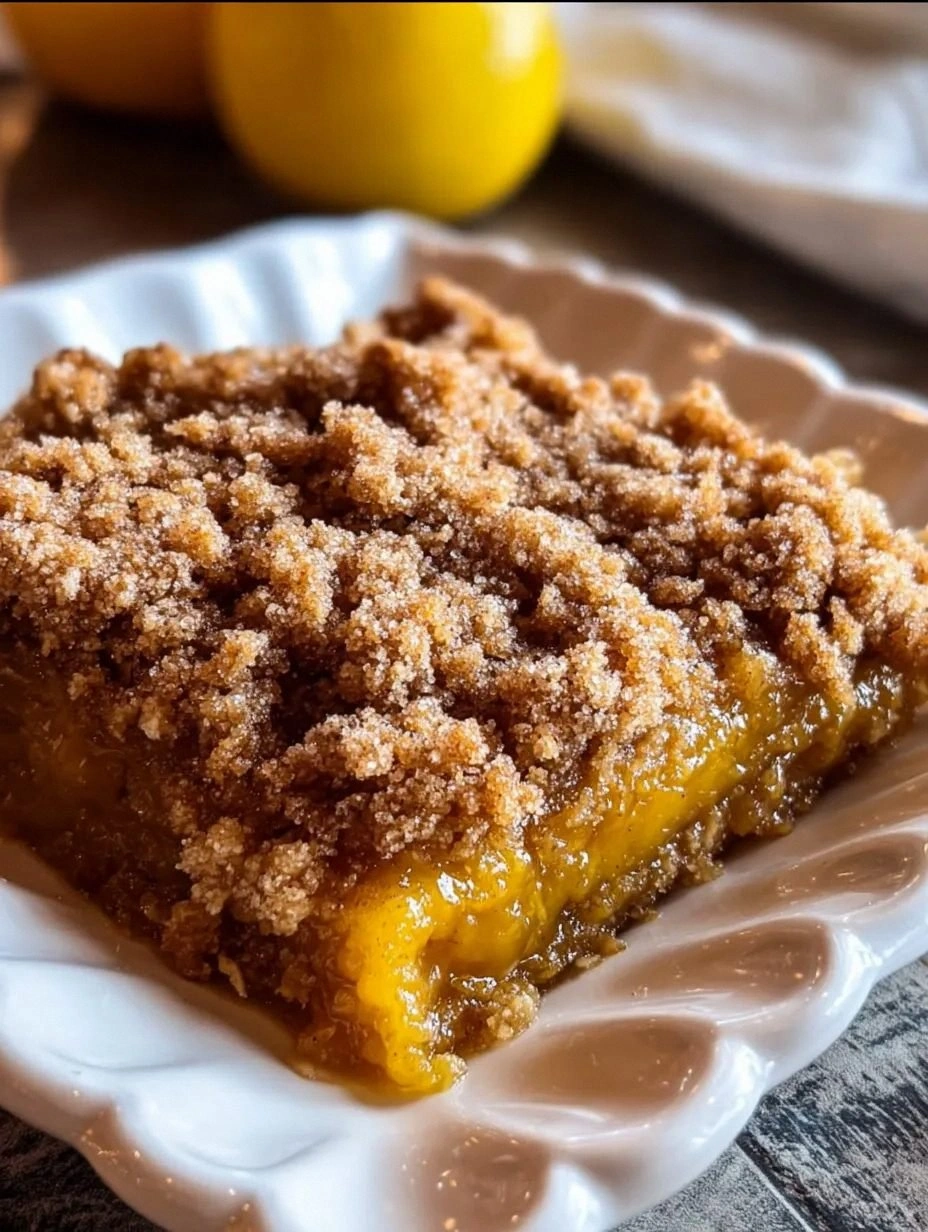
Picture this: it’s a crisp October afternoon, the wind is whispering through the golden leaves, and you’re standing in front of your pantry with a half‑empty can of pumpkin puree, a bag of oats, and a sudden, unapologetic craving for something that feels like a warm hug in a bowl. I was in the same spot last week, after a disastrous attempt at a pumpkin cheesecake that turned out more like a brick, when my roommate dared me to “make something that actually works” and I accepted the challenge like a knight to a dragon. The kitchen was a battlefield of spilled sugar, over‑whipped cream, and a lingering scent of burnt butter that made my eyes water, but that very chaos sparked the birth of the ultimate pumpkin crisp you’re about to devour.
From the moment the first spoonful hits your tongue, you’ll be hit with a symphony of flavors: the earthy sweetness of pumpkin, a buttery caramel undertone, and a spice mix that sings like a choir of autumnal notes. The top layer crackles with a golden‑brown crust that shatters under the fork with the satisfying snap of thin ice, while the heart of the dish stays luxuriously creamy, almost like a velvety custard that refuses to set. I dare you to taste this and not go back for seconds, because the combination of textures and flavors is engineered to make you forget every other dessert you’ve ever known.
What makes this version truly stand out is a secret weapon I stumbled upon while scrolling through a vintage cookbook: a splash of heavy cream folded into the pumpkin filling just before baking. Most recipes either skip the cream or drown the crisp in too much liquid, but this little addition creates a silk‑smooth custard that holds its shape while still being pour‑over‑ready. I’ll be honest — I ate half the batch before anyone else got to try it, and that’s a testament to how addictive this thing is. The result? A crisp that’s both crunchy and creamy, with a depth of flavor that makes every bite feel like a celebration of fall itself.
Okay, ready for the game‑changer? In the next sections I’ll walk you through every single step — from selecting the perfect pumpkin puree to mastering the caramelized oat topping. By the end, you’ll wonder how you ever made a pumpkin dessert any other way. Picture yourself pulling this out of the oven, the whole kitchen smelling incredible, the steam rising like a cozy blanket, and a golden crust that glistens invitingly. Let me walk you through every single step — by the end, you’ll wonder how you ever made it any other way.
What Makes This Version Stand Out
- Texture: The dual‑layer approach gives you a crunchy oat topping that shatters like thin ice, while the interior stays creamy and custard‑like, delivering a perfect contrast in every bite.
- Flavor Depth: A carefully balanced spice blend of cinnamon, nutmeg, ginger, and a whisper of cloves creates a warm, aromatic profile that lingers on the palate.
- Simplicity: Despite the gourmet feel, the recipe uses pantry staples and a handful of steps, making it accessible even for novice bakers.
- Ingredient Quality: Using real pumpkin puree (or freshly roasted pumpkin) and unsalted butter ensures a clean, rich taste without any off‑notes.
- Crowd‑Pleaser: This crisp consistently earns rave reviews at potlucks; even the pickiest eaters admit they can’t resist the caramel‑kissed crunch.
- Make‑Ahead Potential: The crisp can be assembled ahead of time and baked just before serving, saving you stress on busy evenings.
- Versatility: Swap nuts, add a drizzle of maple syrup, or fold in chocolate chips for personalized twists without compromising the core structure.
- Visual Appeal: The golden‑brown topping with a glossy finish looks stunning on any dessert platter, making it Instagram‑ready without effort.
Inside the Ingredient List
The Flavor Base
Pumpkin Puree (2 cups): This is the heart of the dish. Choose a pure pumpkin puree that’s smooth and free of added spices; if you’re feeling ambitious, roast a small sugar pumpkin, scoop out the flesh, and blend it yourself for an unbeatable fresh taste. Skipping this step for canned pie filling will introduce unwanted spices and a thinner consistency, which can make the crisp soggy.
Heavy Cream (½ cup): The cream is the secret that transforms a regular pumpkin bake into a custard‑rich marvel. It adds a luxurious mouthfeel and helps the pumpkin layer set without becoming rubbery. If you’re dairy‑free, coconut cream works as a swap, though it will impart a subtle coconut flavor.
Egg (1 large, lightly beaten): The egg acts as a binder, giving the filling structure so it doesn’t collapse when you cut into it. Over‑beating can introduce too much air, leading to cracks; a gentle whisk is all you need.
Brown Sugar (½ cup) & Granulated Sugar (¼ cup): The brown sugar contributes caramel notes, while the white sugar adds clean sweetness. If you prefer a less sweet version, reduce both by a tablespoon each, but remember the topping relies on sugar for that golden crunch.
Spice Blend (Cinnamon 1 tsp, Nutmeg ½ tsp, Ginger ¼ tsp, Cloves ¼ tsp): These spices are the aromatic backbone. Toast them briefly in a dry pan to release essential oils before mixing; this tiny step amplifies their fragrance dramatically.
The Texture Crew
Rolled Oats (1 cup): Oats provide the satisfying crunch and absorb some of the butter, creating a toasty, buttery crumble. If you use instant oats, the texture will become mushy; stick with old‑fashioned rolled oats for that perfect bite.
All‑Purpose Flour (½ cup): Flour binds the oat topping, ensuring it holds together during baking. Gluten‑free flour blends work fine, but you may need to add a tablespoon of xanthan gum to mimic the binding power.
Unsalted Butter (½ cup, melted): Butter is the flavor engine of the topping, delivering a glossy finish and deep caramelization. Melt it slowly over low heat; overheating can cause the butter to separate, resulting in a greasy top.
Chopped Pecans (½ cup): Pecans add a buttery, earthy crunch that contrasts beautifully with the oats. Toast them lightly to bring out their natural oils, and if you’re allergic, swap with toasted pumpkin seeds for a similar texture.
The Unexpected Star
Vanilla Extract (1 tsp): A splash of vanilla rounds out the spice profile and adds a subtle floral note that lifts the entire dessert. Using pure vanilla extract (not imitation) makes a noticeable difference in the final aroma.
Salt (¼ tsp): A pinch of salt balances the sweetness and accentuates the spices. Skipping it will leave the dish tasting flat, no matter how much sugar you add.
The Final Flourish
Maple Syrup (optional drizzle, 2 tbsp): A light drizzle of maple syrup right after baking adds a glossy sheen and a hint of wood‑smoked sweetness that pairs beautifully with the pumpkin. If you’re avoiding extra sugar, you can skip this step without sacrificing texture.
Everything's prepped? Good. Let's get into the real action...
The Method — Step by Step
Preheat your oven to 350°F (175°C). While the oven warms, grease a 9‑inch square baking dish with a thin layer of butter; this ensures the crisp releases cleanly later. I like to line the bottom with parchment paper for an extra safety net — it’s a small step that pays off big when you’re eager to dig in.
In a large mixing bowl, combine the pumpkin puree, heavy cream, and the lightly beaten egg. Whisk gently until the mixture is smooth and glossy; you’ll notice the color deepening into a rich amber. This is the moment of truth: the batter should feel thick but pourable, like a velvety custard that clings to the spoon.
Watch Out: If the egg is added too quickly, it can scramble; pour it in a steady, thin stream while whisking.Add the brown sugar, granulated sugar, vanilla extract, and the full spice blend to the pumpkin mixture. Stir until everything is fully incorporated and the aroma of cinnamon and nutmeg fills the kitchen. Taste a tiny spoonful now — you’ll feel the warmth of the spices and the subtle caramel from the brown sugar.
Transfer the pumpkin filling into the prepared baking dish, spreading it evenly with a spatula. The surface should be smooth, but don’t worry about a perfect finish; the topping will create the final texture. Let it sit for a minute while you prep the crumble; this brief rest helps the flavors meld.
Now, for the topping: In a separate bowl, toss the rolled oats, flour, brown sugar, and a pinch of salt together. Add the melted butter and use your fingers to crumble the mixture until it resembles coarse sand with glossy butter droplets. Finally, fold in the toasted pecans (or pumpkin seeds) for that extra crunch.
Kitchen Hack: Sprinkle a tablespoon of brown sugar directly onto the topping before baking; it caramelizes and creates an extra glossy, crackly surface.Evenly distribute the oat mixture over the pumpkin layer, pressing lightly with the back of a spoon to create a uniform crust. The topping should cover the pumpkin completely, but you can leave a few small gaps for steam to escape — this prevents a soggy center.
Place the dish in the preheated oven and bake for 30‑35 minutes, or until the edges of the topping turn a deep golden‑amber and you hear a faint crackle. Around the 20‑minute mark, rotate the pan halfway to ensure even browning; this is especially important if your oven has hot spots.
When the crisp is done, remove it from the oven and let it rest on a cooling rack for at least 10 minutes. This rest period allows the custard interior to set, making it easier to cut clean squares. While it cools, drizzle the optional maple syrup over the top for a glossy finish that catches the light.
Serve warm, perhaps with a dollop of whipped cream or a scoop of vanilla ice cream. The contrast between the hot, creamy interior and the cool, creamy ice cream creates a dreamy temperature play that will have your guests reaching for seconds. And there you have it — a pumpkin crisp that’s crunchy, creamy, and undeniably addictive.
That's it — you did it. But hold on, I've got a few more tricks that'll take this to another level...
Insider Tricks for Flawless Results
The Temperature Rule Nobody Follows
Never bake a crisp straight from the fridge. Let the assembled dish sit at room temperature for 15 minutes before sliding it into the oven; this ensures the butter in the topping melts evenly, producing a uniform golden crust. I once tried baking a chilled dish and ended up with a soggy middle and uneven browning, a lesson learned the hard way.
Why Your Nose Knows Best
Rely on scent, not just the timer. When the topping starts to emit a nutty, caramel aroma, you’re close to the perfect finish. If you’re uncertain, open the oven and give it a quick sniff; the smell of toasted oats is the cue to pull it out.
The 5‑Minute Rest That Changes Everything
Allow the crisp to rest for exactly five minutes after baking before cutting. This short pause lets the custard thicken just enough to hold its shape, preventing those dreaded runny squares. Skipping this step results in a mess on the plate and a loss of that coveted creamy center.
Butter‑Melt Technique
When melting butter for the topping, do it over low heat and add a splash of water (about a teaspoon). This emulsifies the butter, creating a glossy, cohesive crumble that spreads evenly without clumping. It’s a subtle trick that makes the topping look bakery‑professional.
Nut‑Swap Strategy
If you’re allergic to nuts or simply don’t have them on hand, substitute with toasted pumpkin seeds or sunflower seeds. The seeds provide a similar crunch and a slightly earthy flavor that pairs wonderfully with pumpkin. I’ve tried both and can confirm the texture remains just as satisfying.
Creative Twists and Variations
This recipe is a playground. Here are some of my favorite ways to switch things up:
Maple‑Brown Sugar Fusion
Replace half of the brown sugar in the topping with pure maple syrup. The syrup adds a subtle wood‑smoked sweetness and a glossier finish. Perfect for those who love the taste of pancakes in a dessert.
Chocolate Chip Delight
Stir ½ cup of dark chocolate chips into the oat topping before baking. The chips melt slightly, creating pockets of molten chocolate that contrast beautifully with the pumpkin custard.
Spiced Apple Add‑In
Fold in one cup of diced, lightly sautéed apples (with a pinch of cinnamon) into the pumpkin mixture. The apples add a juicy burst and extra texture, turning the crisp into a hybrid apple‑pumpkin dessert.
Vegan Version
Swap the heavy cream for coconut cream, use a flax egg (1 tbsp ground flaxseed + 3 tbsp water) instead of a chicken egg, and replace butter with coconut oil. The result is a dairy‑free crisp that still boasts a rich, creamy interior.
Gluten‑Free Crunch
Replace all‑purpose flour with a gluten‑free flour blend and use certified gluten‑free oats. Add a tablespoon of almond meal for extra structure. The texture remains delightfully crunchy without the gluten.
Savory Pumpkin Crisp
Turn this sweet dish on its head by omitting the sugars and adding grated Parmesan, rosemary, and a dash of smoked paprika to the topping. Serve it as a side dish for roasted chicken or pork. The savory version is a crowd‑pleaser at dinner parties.
Storing and Bringing It Back to Life
Fridge Storage
Cover the crisp tightly with aluminum foil or transfer leftovers to an airtight container. It will keep fresh for up to 4 days in the refrigerator. When you’re ready to eat, reheat a slice in a 300°F oven for 10‑12 minutes; the topping will re‑crisp nicely.
Freezer Friendly
Freeze the unbaked assembled crisp for up to 2 months. Wrap the dish in a double layer of plastic wrap, then foil, to prevent freezer burn. When you’re ready to bake, add 10 minutes to the original baking time and bake straight from frozen at 350°F.
Best Reheating Method
For a quick microwave fix, place a slice on a microwave‑safe plate, cover loosely with a damp paper towel, and heat for 45‑60 seconds. To revive the crunch, finish with a 2‑minute blast under the broiler — watch closely to avoid burning. Adding a tiny splash of water (about a teaspoon) before reheating helps steam the custard back to its silky perfection.